If you want to export your Code Scanner results to Bitbucket, please follow these steps:
- Once you have logged in to Storyfier, click on the Create Issue button located in the results of your scan.
2. Click on the Bitbucket tab.
3. You will be asked to login to your Atlassian account.
Note: If you have already logged into your Atlassian account, skip to Step 4.
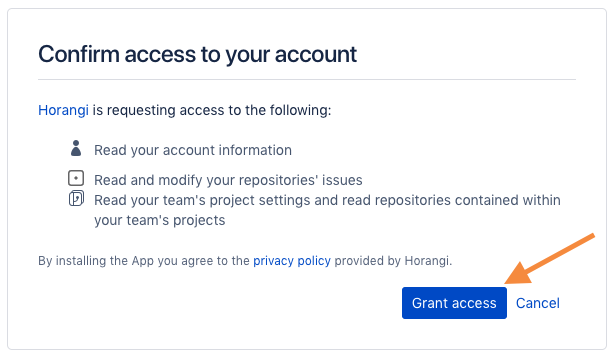
4. You will be asked to confirm access to your Bitbucket account, click the Grant access button.
5. You will be redirected back to your Storyfier Detect page. You will now be able to export the findings from your existing repositories.
Permissions
In order for Storyfier to deeply integrate with and run scans in your Bitbucket repositories, we would need access to some of your data to ensure that everything works properly.
Read Your Account Information
This allows Storyfier to authenticate with your Bitbucket account.
Read and Modify Your Repositories' Issues
Storyfier needs this so you can create new issues based on the results of your scans.
Note: The Storyfier platform does not modify any issues that it did not create.
Read your team’s project settings and read repositories contained within your team’s projects
This permission allows Storyfier to get a list of all your code repositories and allow Code Scanner to scan your code.
What We Can’t Do
We only ask for the minimum amount of data needed for the integration to function. Here are things that the Bitbucket integration would never ask access for.
Edit Your Code
Storyfier will never ask write access to your repositories.
Change your project settings.
Whatever settings you configured for your repositories will remain as is.