How to onboard your AWS account to Warden
Setting up Warden in AWS can be done through the Storyfier dashboard. There are two ways to get started:
-
Adding the Warden IAM roles through a CloudFormation template (recommended)
-
Manually setting up the necessary IAM roles.
- Do not close the creation screen during the AWS installation.
- Login to your AWS Account in another browser window.
- Make sure that you have Administrator access to the AWS account you are logging in.
CloudFormation Setup (Recommended)
AWS CloudFormation is a service that helps you model and set up AWS resources so that you can spend less time managing resources and more time using the application.
1. Click Launch CloudFormation Stack.
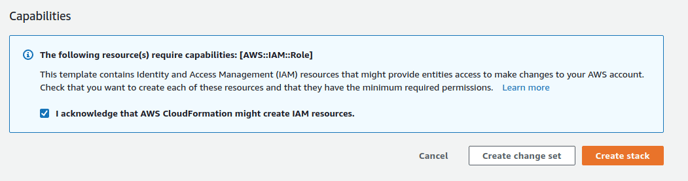
2. Check "I acknowledge that AWS CloudFormation might create IAM resources." and click Create Stack.
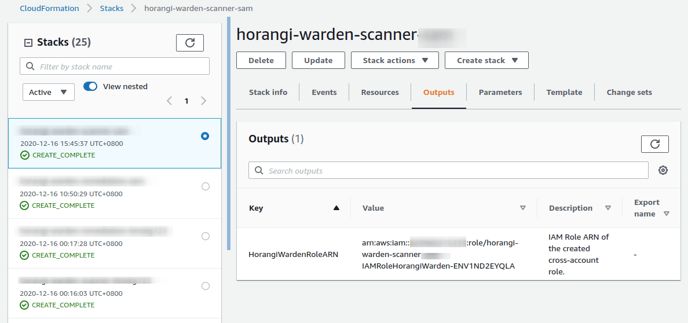
3. Once the CloudFormation Stack is "CREATE_COMPLETE", copy "HorangiWardenRoleARN" from the Outputs tab and paste it in the Paste Role ARN here text box.

4. Click Add Account.
5. A confirmation dialog will appear asking you if you would like to start a scan now. You can choose to start your first scan, or postpone it for the next scanning schedule.
6. Warden will then prompt you to create the role needed for One-Click Remediation. You can choose to skip this step or proceed to Setup One-Click Remediation.
Manual Setup (for Advanced Users)
For the extra cautious and tinkerers, you can adjust and limit to what degree you want Warden to monitor your AWS cloud assets. The choice is yours.
1. Access the IAM Roles section and Create role.
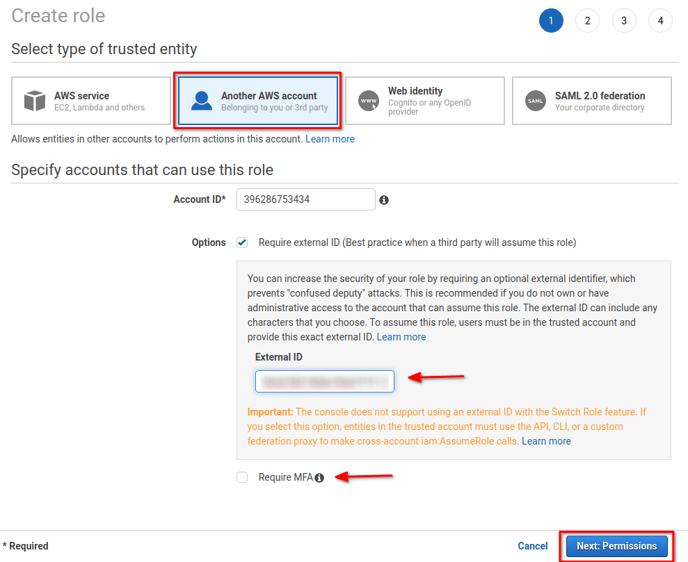
2. When prompted for the trusted entity type, select Another AWS Account.
3. Enter Horangi's AWS Account Number 396286753434 for the Account ID to trust.
4. Check Require external ID and enter the unique External ID displayed on Step 6 of the step-by-step guide.
5. Do not check Require MFA.
6. Click Next: Permissions.

7. Select the Security Audit managed IAM policy.
8. Click Next: Tags.
9. Click Next: Review.
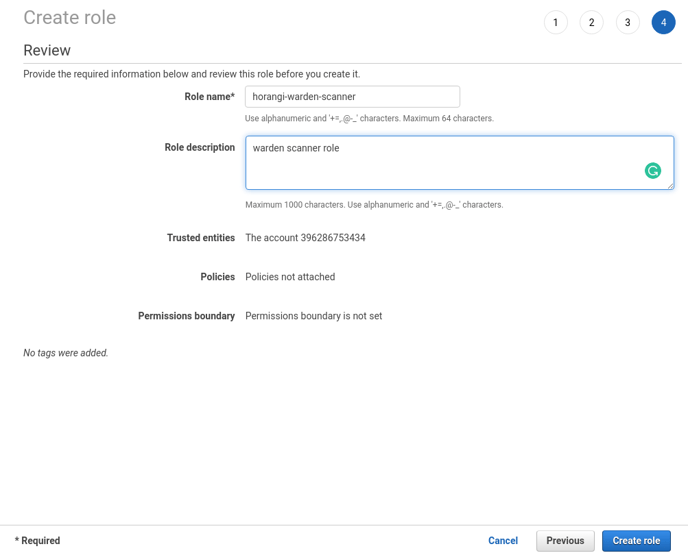
10. Enter horangi-warden-scanner for the Role name and enter a description of your choice and click Create Role.
11. Search for the newly created role (i.e horangi-warden-scanner) and copy the Role ARN.
12. After the role has been created, go to the role's page.
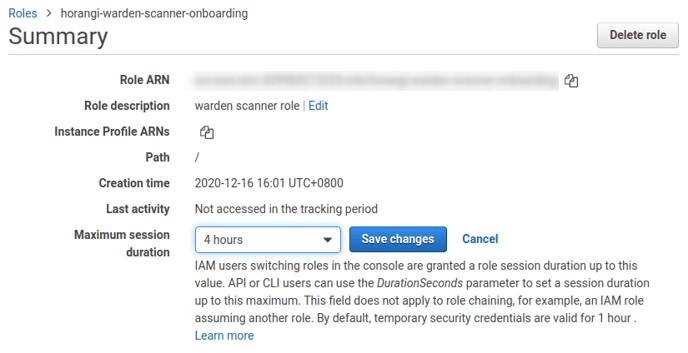
13. Click on the field Maximum CLI/API session duration and change the value from 1 hour to 4 hours.
14. Save your changes.
15. Go back to Storyfier and paste the Role ARN you just copied in the Paste Role ARN here text box.
16. Click Add Account.
17. A confirmation dialog will appear asking you if you would like to start a scan now. You can choose to start your first scan, or postpone it for the next scanning schedule.
18. Warden will then prompt you to create the role needed for One-Click Remediation. You can choose to skip this step or proceed to Setup One-Click Remediation.