Warden supports GCP environments.
- Onboarding a GCP Project
- Onboarding a GCP Organization
- Enable Scanning for GCP workspace identities (IAM-specific)
Onboarding a Google Cloud Platform (GCP) Project
Setting up Warden in a GCP project can only be done the manual way at this time.
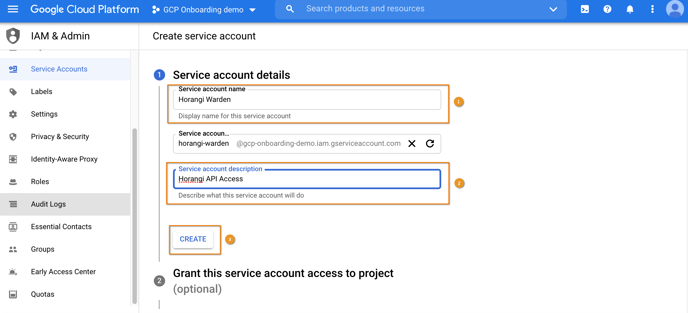
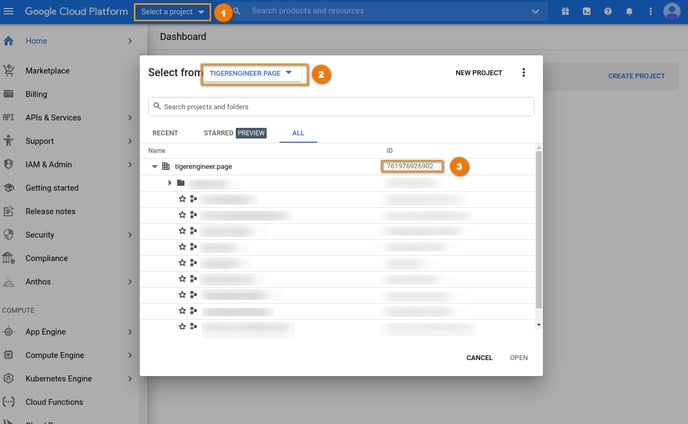
1. Log into your Google Cloud Console, navigate to IAM Admin > Service Accounts and select the project to onboard.
2. Click on Create Service Account.
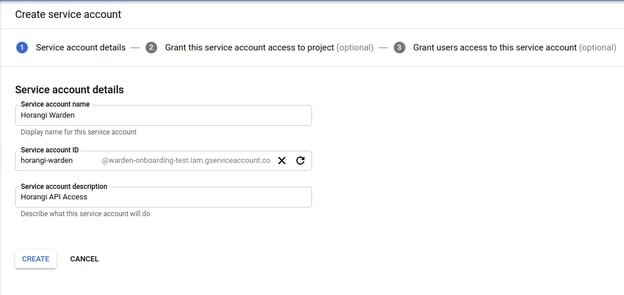
3. Under Service account details, enter Horangi Warden as the Service account name, then enter Horangi API Access as the Service account description.
4. Click on Create.
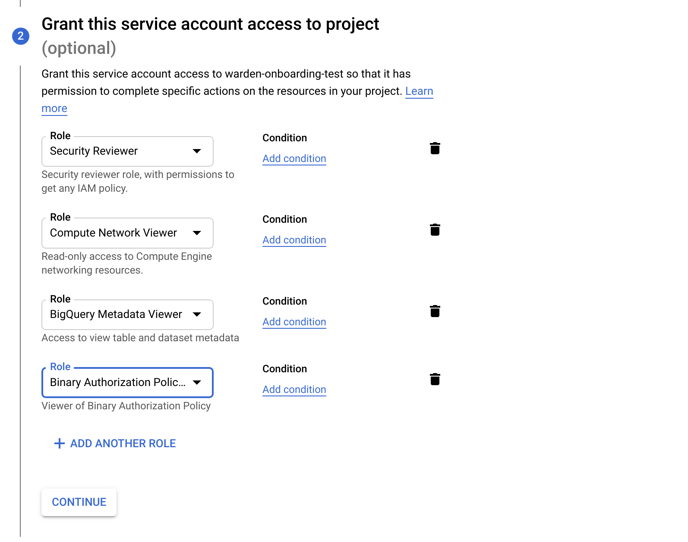
5. Under Service account permissions (optional), select the following roles to attach to the service account.
- IAM > Security Reviewer
- Compute Engine > Compute Network Viewer
- BigQuery > BigQuery Metadata Viewer
- Binary Authorisation > Binary Authorisation Policy Viewer
- Other > Activity Analysis Viewer
6. Click on Continue.
7. Under Grant users access to this service account (optional), leave the fields blank and click on Done.
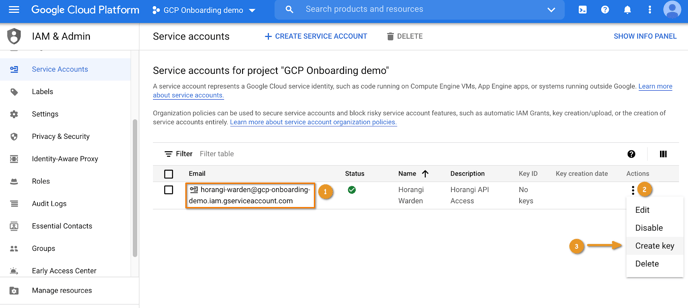
8. Select the service account that you just created (Horangi Warden) in the Service Accounts page.
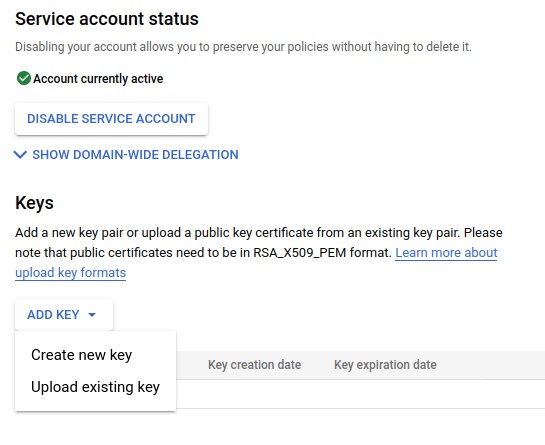
9. Click on Add Key > Create New Key.
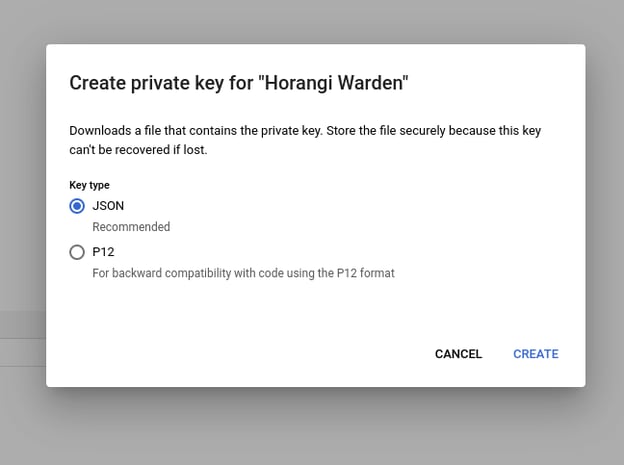
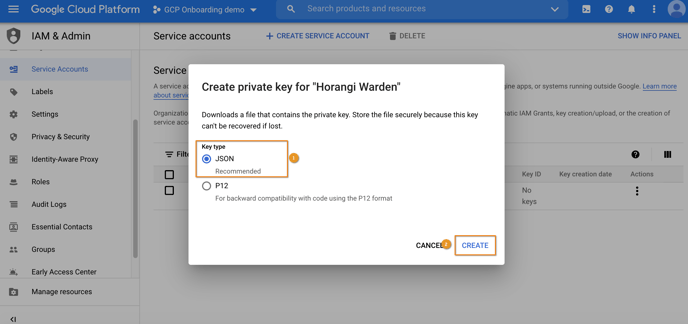
10. Leave the default JSON selected and click Create.
11. Save the provided JSON file.
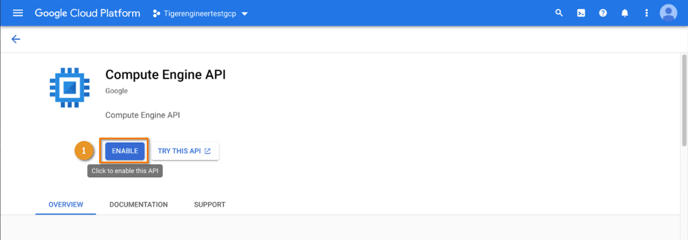
12. Enable the APIs necessary for Warden to work.
Using Google Cloud Shell:
gcloud services enable compute.googleapis.com sqladmin.googleapis.com storage.googleapis.com dns.googleapis.com cloudkms.googleapis.com iam.googleapis.com container.googleapis.com monitoring.googleapis.com logging.googleapis.com cloudresourcemanager.googleapis.com bigquery.googleapis.com binaryauthorization.googleapis.com policyanalyzer.googleapis.com
Via the Google Cloud Console API Library:
Enable the following APIs:
- Compute Engine API
- Cloud SQL Admin API
- Cloud Storage API
- Cloud DNS API
- Cloud Key Management Service (KMS) API
- Identity and Access Management (IAM) API
- Kubernetes Engine API
- Stackdriver Monitoring API
- Cloud Logging API
- Cloud Resource Manager API
- BigQuery API
- Binary Authorization API
- Admin SDK API
- Policy Analyzer API
The Compute Engine and Cloud DNS APIs require you to have billing enabled on the projects you are onboarding.
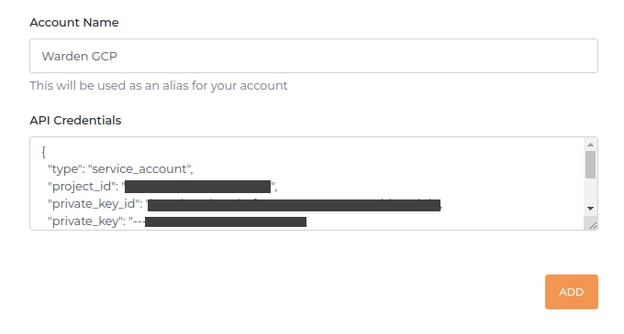
13. Copy and paste the contents of the JSON file into the API Credentials field.
14. Click on Add.
Enable Scanning for Google Workspace Identities (GCP Project).
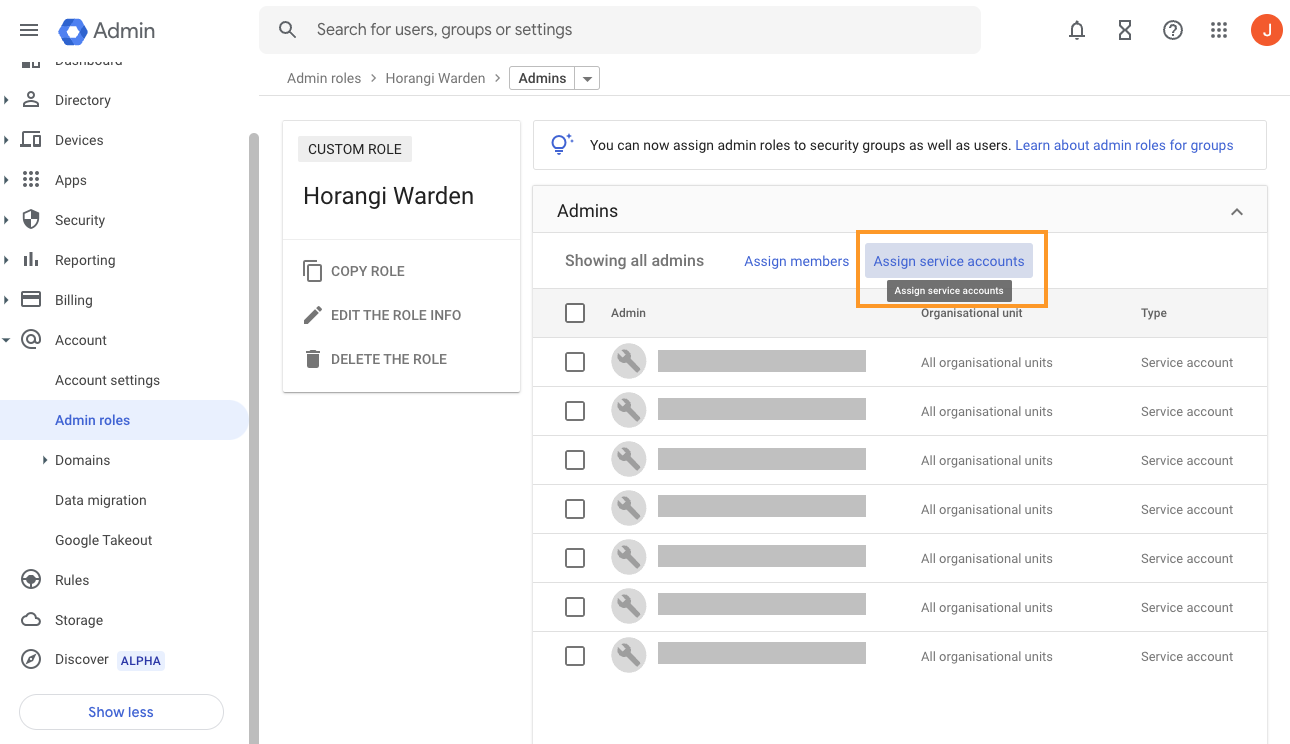
15.To enable Warden to scan Google Workspace Identities, the following steps are necessary:
- Go to admin.google.com -> Admin Roles
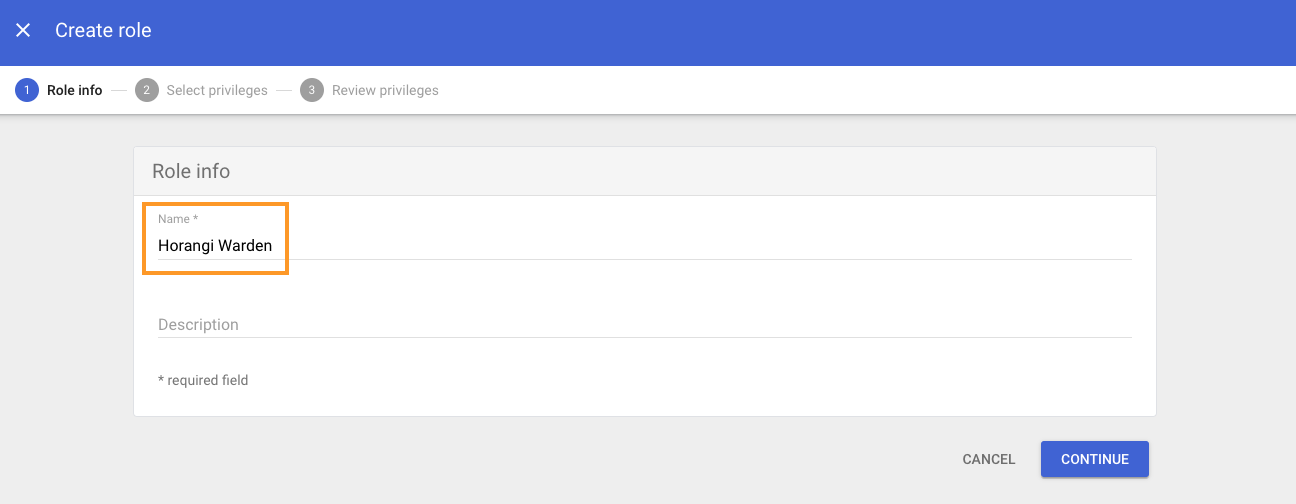
- Click Create New Role
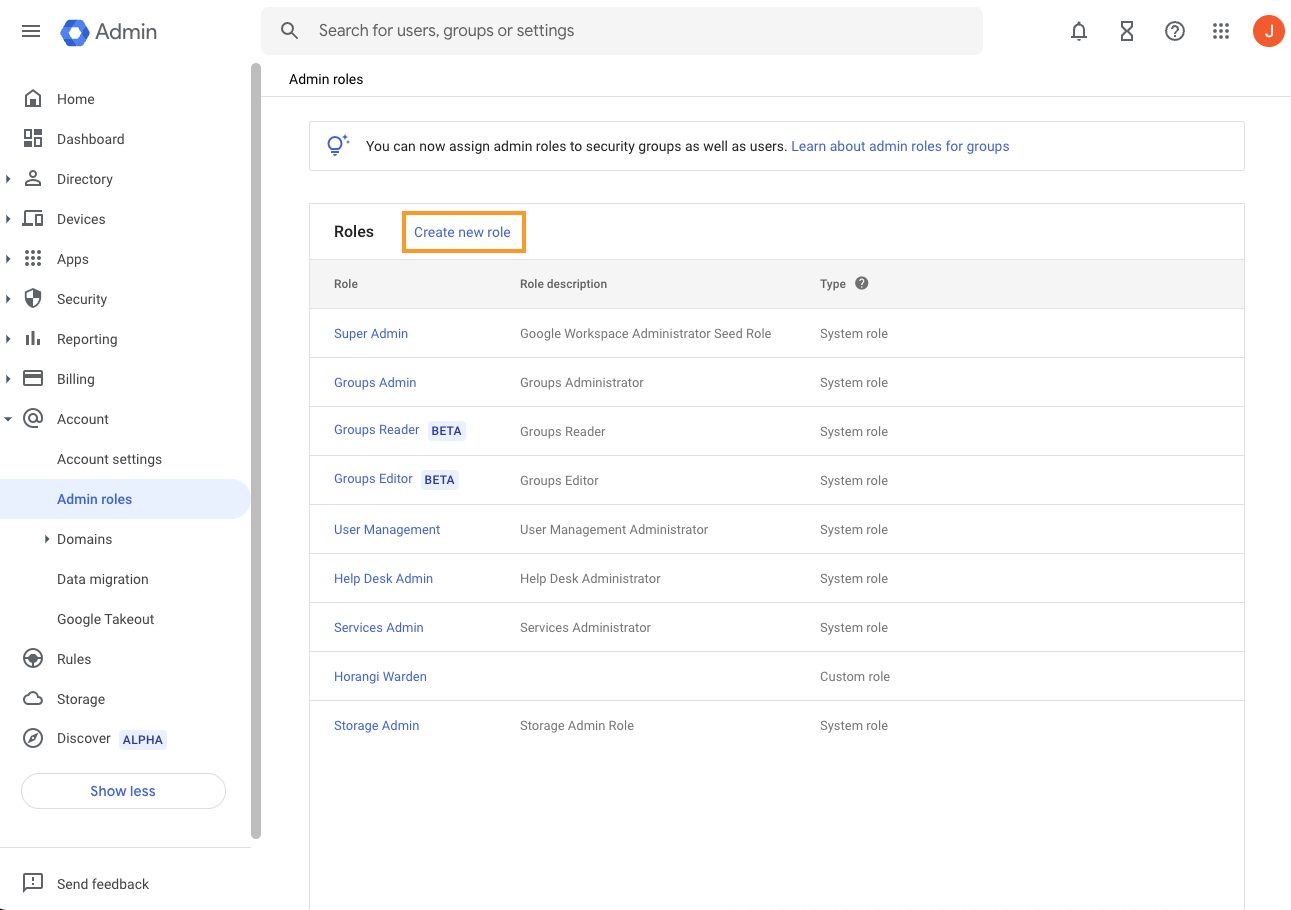
- Fill in the name (For example, Horangi Warden)

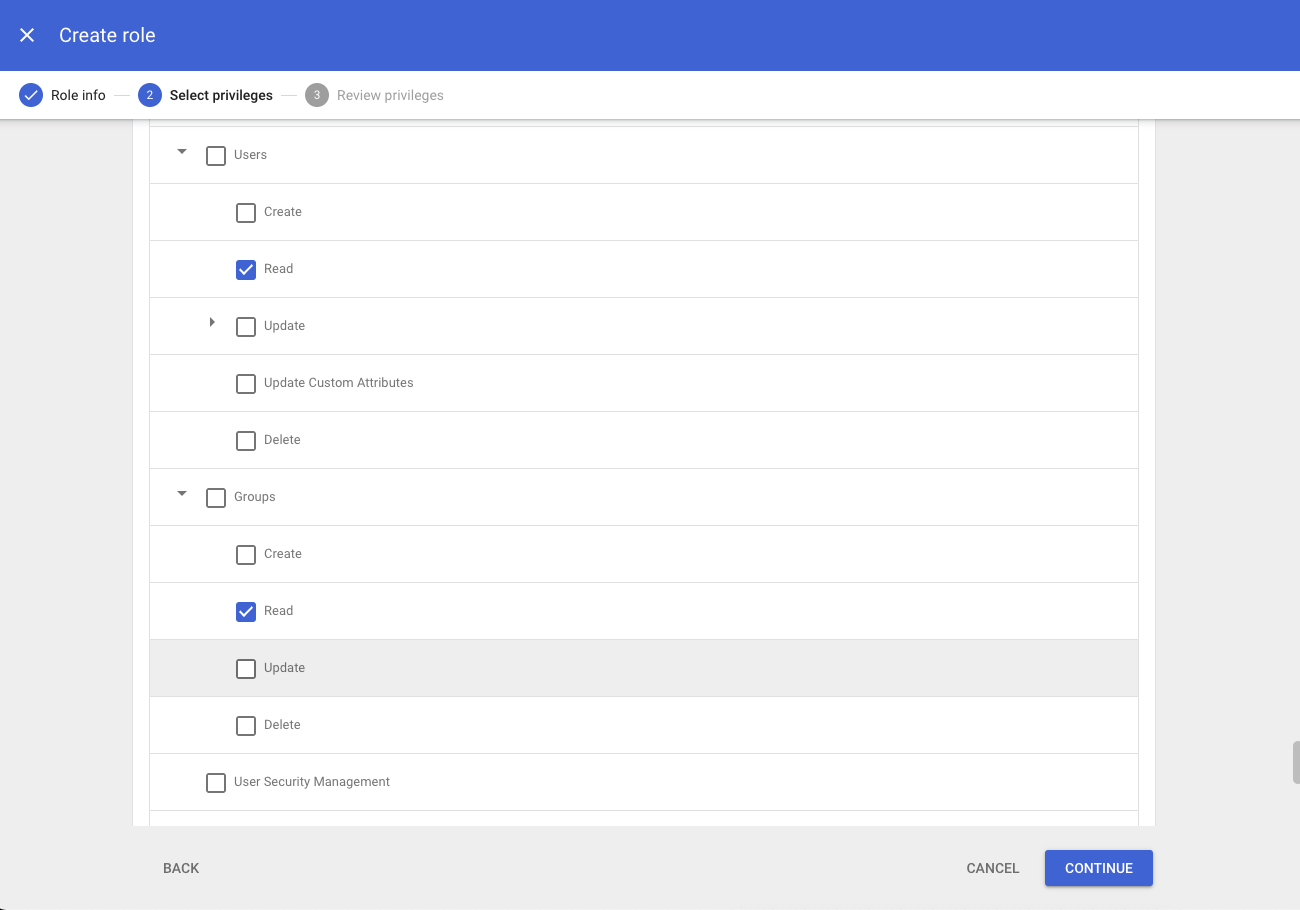
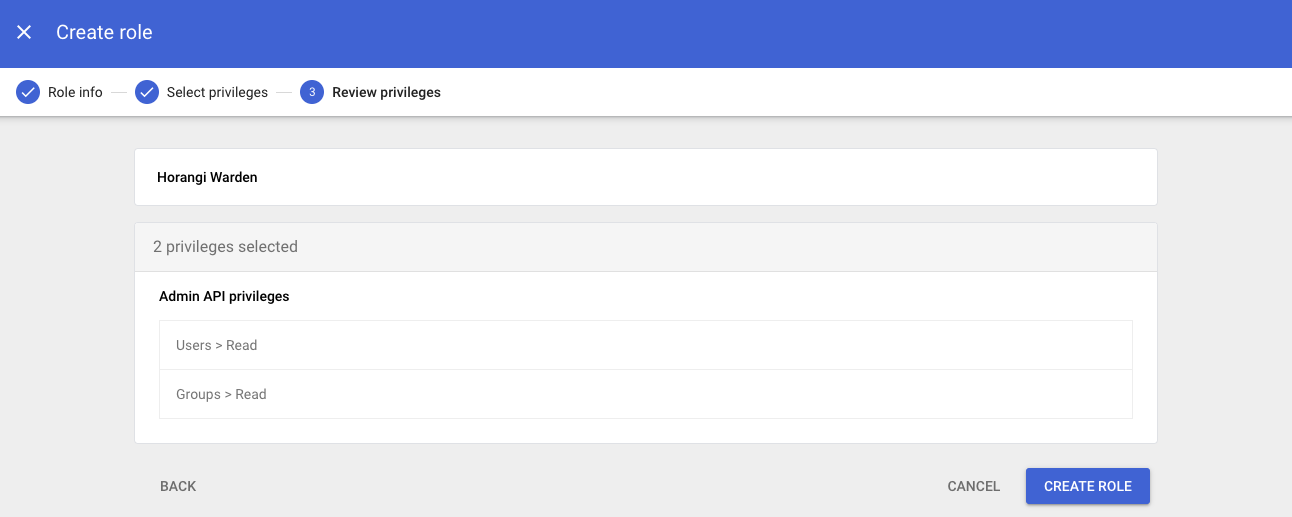
- Scroll down to Admin API privileges and tick Users->Read and Groups->Read. Click Continue. If done correctly, you will only see 2 permissions, as follows:

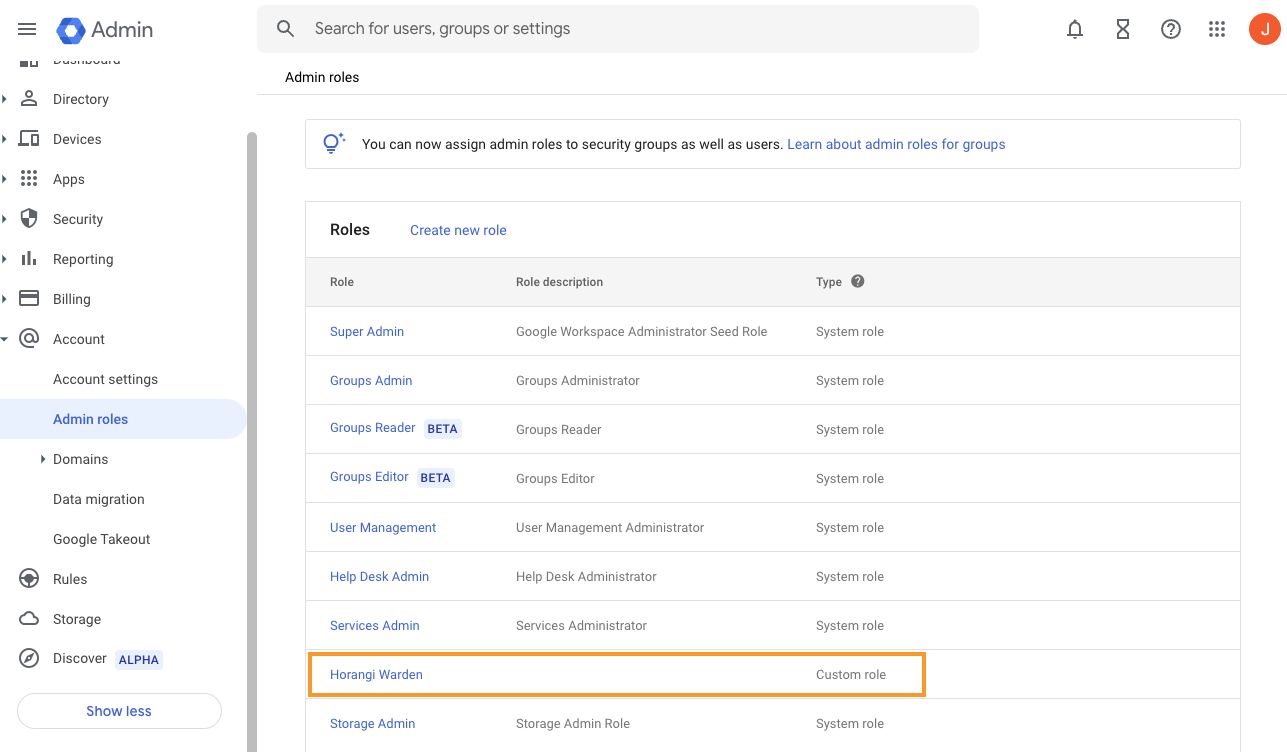
- Go back to the Admin Role page and select Horangi Warden (the role that was created earlier)

- Click ASSIGN ROLE -> Assign Service Accounts

- Type in the service account name from Step 3 then Click Assign Role.
Onboarding a GCP Organization
For all GCP projects that you want to scan, Warden will enable the following APIs during scanning.
- Compute Engine API
- Cloud SQL Admin API
- Cloud Storage API
- Cloud DNS API
- Cloud Key Management Service (KMS) API
- Identity and Access Management (IAM) API
- Kubernetes Engine API
- Stackdriver Monitoring API
- Cloud Logging API
- Cloud Resource Manager API
- BigQuery API
- Binary Authorization API
- Admin SDK API
- Policy Analyzer API
If you are unable to create the IAM Role (see step 10 below), you will have to manually enable all of the above APIs in each project. You can run the following command in google cloud shell to enable the APIs:
gcloud services enable compute.googleapis.com sqladmin.googleapis.com storage.googleapis.com dns.googleapis.com cloudkms.googleapis.com iam.googleapis.com container.googleapis.com monitoring.googleapis.com logging.googleapis.com cloudresourcemanager.googleapis.com bigquery.googleapis.com binaryauthorization.googleapis.com policyanalyzer.googleapis.com
Repeat the command once for each project.
Pre-Requisites:
- A GCP account within the organization assigned with the Organization Administrator and Organization Role Administrator roles.
- An active Cloud Billing Account
Adding a GCP Cloud Organization
1. Login to the GCP console using an account assigned with the Organization Administrator and Organization Role Administrator roles.
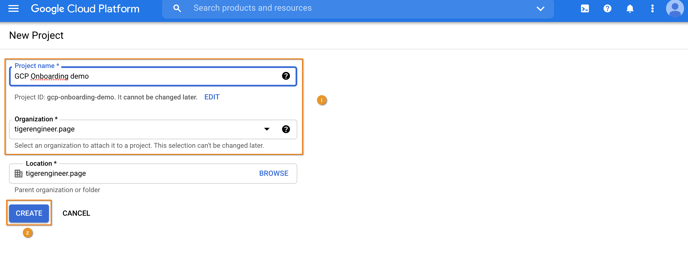
2. Create a new project within the organization to ensure API limits for Warden are controlled separately from production workloads.
3. Enter a unique project name and click Create. You will then be redirected to the project view.
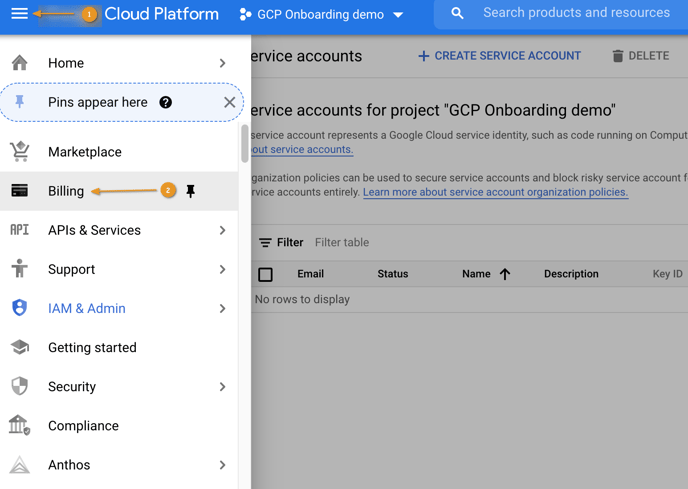
4. Click the hamburger menu button on the top left corner and click Billing.
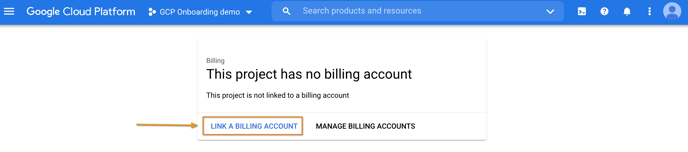
5. If a billing account has already been linked to the project, you should see the Billing Overview page. Otherwise, click Link a Billing Account.
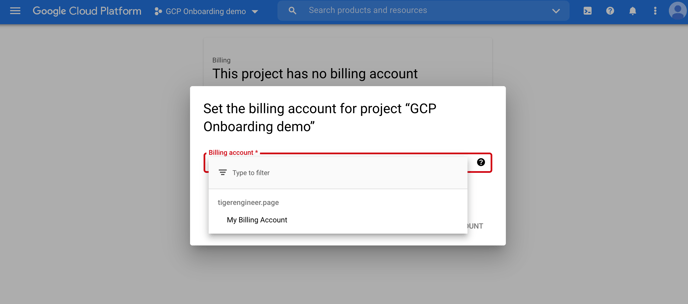
6. Select the billing account you would like to associate the project with from the dropdown menu and click on Link Account.
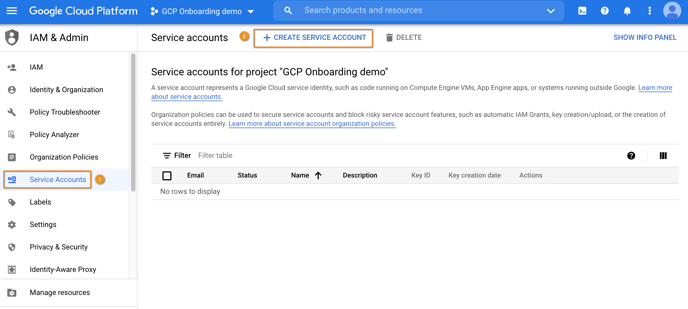
7. Navigate to IAM & Admin > Service Accounts, then click on Create Service Account.
8. Under Service account details, enter Horangi Warden as the Service account name, then enter Horangi API Access as the Service account description.
9. Click Create, then Done.
10. Note down the email address of the service account you just created (Horangi Warden) in an accessible location.
11. Click the 3-dot menu icon under the Actions column for the new service account and click Create key.
12. Leave the Key type as JSON and click Create.
13. Save the JSON file to a secure location. You will not be able to recover the key if you lose it.
14. Enable the APIs necessary for Warden to work.
Method 1: Using Google Cloud Shell
Type the following command in the Google Cloud Shell:
gcloud services enable compute.googleapis.com sqladmin.googleapis.com storage.googleapis.com dns.googleapis.com cloudkms.googleapis.com iam.googleapis.com container.googleapis.com monitoring.googleapis.com logging.googleapis.com cloudresourcemanager.googleapis.com bigquery.googleapis.com binaryauthorization.googleapis.com cloudbilling.googleapis.com policyanalyzer.googleapis.com
Method 2: Via the Google Cloud Console API Library:
Enable the following APIs:
- Compute Engine API
- Cloud SQL Admin API
- Cloud Storage API
- Cloud DNS API
- Cloud Key Management Service (KMS) API
- Identity and Access Management (IAM) API
- Kubernetes Engine API
- Stackdriver Monitoring API
- Cloud Logging API
- Cloud Resource Manager API
- BigQuery API
- Binary Authorization API
- Cloud Billing API
- Admin SDK API
- Policy Analyzer API
The Compute Engine and Cloud DNS APIs require you to have billing enabled on the projects you are onboarding.

15. Switch back to Organization view to start setting up the organization-wide permissions.
16. Navigate to IAM & Admin > Roles, then click Create Role.
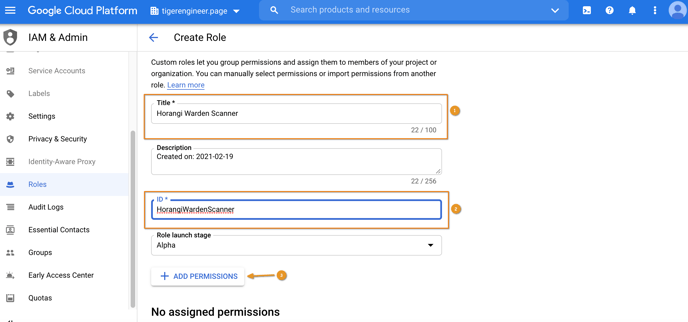
17. Under Title, enter Horangi Warden Scanner, then enter HorangiWardenScanner as the ID.
18. Click Add Permissions.
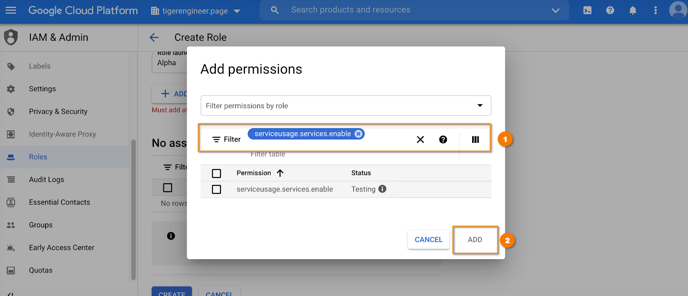
19. Under the Filter table field, enter and select `serviceusage.services.enable`
20. Once the permission has been selected, click Add.
21. Click Create to finish creating the custom role.
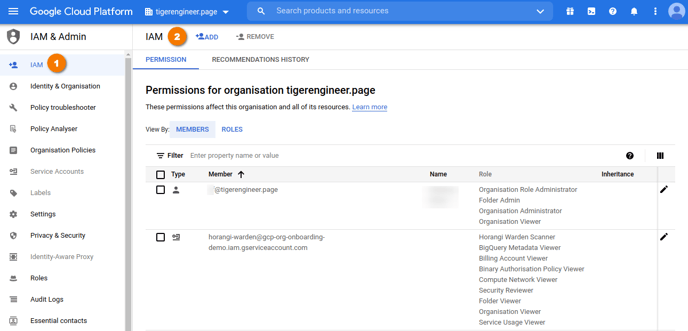
22. Still in Organization view, navigate to IAM & Admin > IAM. Click Add to add permissions for the service account you created in Steps 7-9.
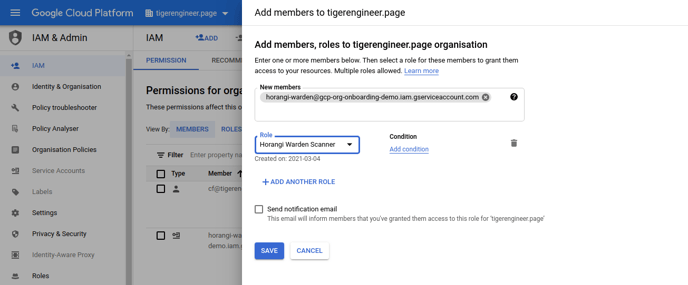
23. Input the email of the service account you created as New members.
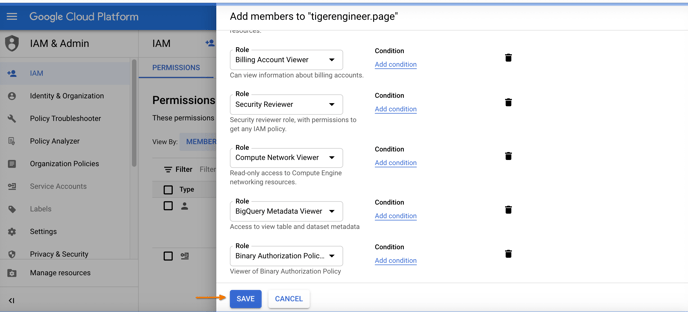
24. Add the following roles:
- Custom > Horangi Warden Scanner (the Role created earlier)
- Resource Manager > Organization Viewer
- Resource Manager > Folder Viewer
- Billing > Billing Account Viewer
- IAM > Security Reviewer
- Compute Engine > Compute Network Viewer
- BigQuery > BigQuery Metadata Viewer
- Binary Authorisation > Binary Authorisation Policy Viewer
- Service Usage > Service Usage Viewer
- Other > Activity Analysis Viewer
If you can’t find the Role `Horangi Warden Scanner`, wait for a few minutes and try again. It may take some time for the Role to appear after creation.
25. Click Save to finish adding permissions.
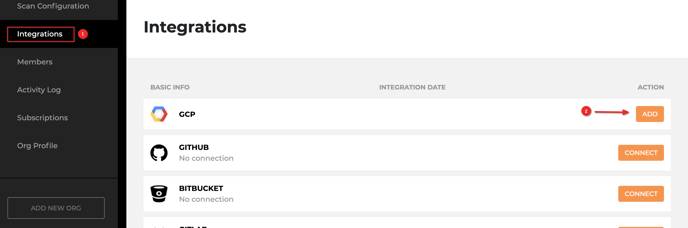
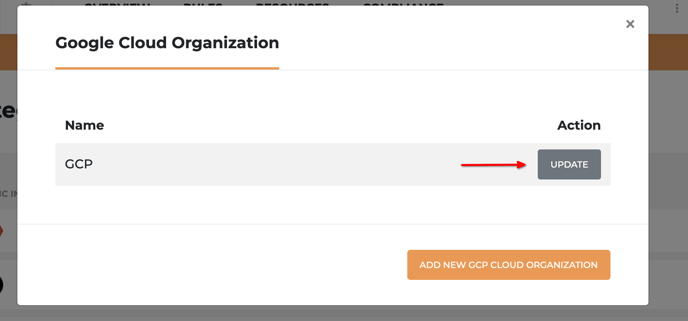
26. Go to Storyfier’s Settings (gear icon) page, then click on Integrations.
27. Click the Add button next to GCP. A popup of the list of organizations linked to your Storyfier org will appear.
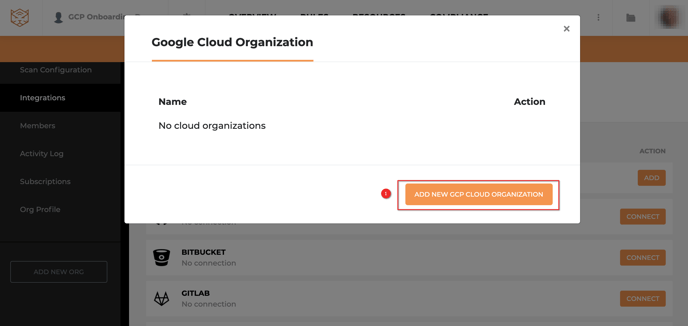
28. Click Add New GCP Cloud Organization.
You can only add a GCP organization once. If you need to make changes to your service account credentials, you can edit an existing GCP organization.
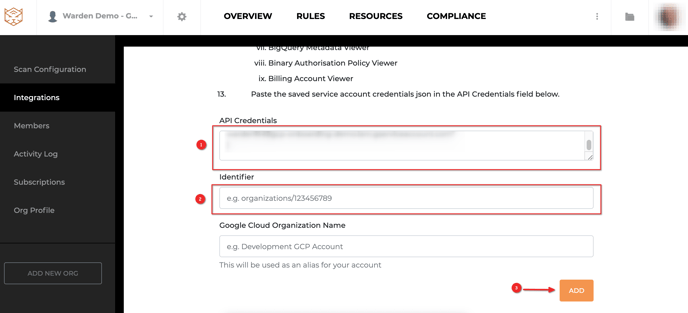
29. Paste the service account credentials JSON file you saved earlier in the API Credentials field.
30. For the Identifier field, enter the text `organizations/` followed by your Organization ID. The Organization ID can be found by clicking on the dropdown menu on the top and looking at the ID next to your organization.
31. Click Add.
Enable Scanning for Google Workspace Identities (GCP Organization).
32. [Optional] To enable Warden to scan Google Workspace Identities, refer to here.
- Go to admin.google.com -> Admin Roles
- Click Create New Role

- Fill in the name (For example, Horangi Warden)
- Scroll down to Admin API privileges and tick Users->Read and Groups->Read. Click Continue. If done correctly, you will only see 2 permissions, as follows:

- Go back to the Admin Role page and select Horangi Warden (the role that was created earlier)
- Click ASSIGN ROLE -> Assign Service Accounts
- Type in the service account name from Step 8 then Click Assign Role.
Caution: You cannot remove GCP organizations in Storyfier and doing so will disable all scans tied to that GCP organization. If you have to remove your organization, contact us at hello@horangi.com for assistance.
Updating GCP Cloud Organization API Credentials
1. Follow Steps 1-25 of Adding a GCP Cloud Organization to create a new Service Account.
2. In Storyfier, click on Settings > Integrations, then click Update next to GCP.
3. Click Update next to the GCP Organization you want to update.
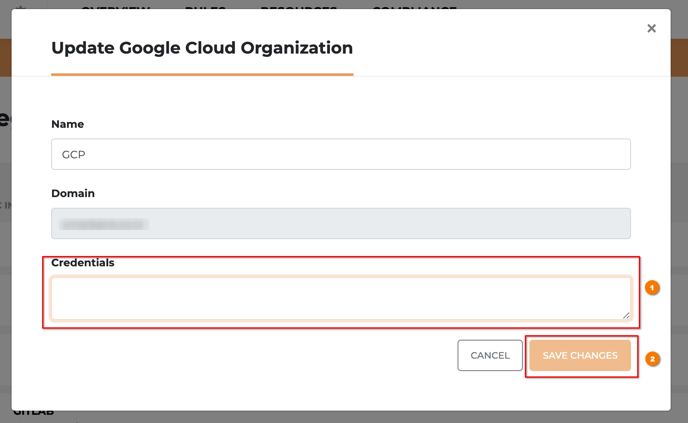
4. Paste the API credentials you downloaded in Step 12 of Adding a GCP Cloud Organization.
5. Click Save Changes.
Importing Projects from a GCP Cloud Organization
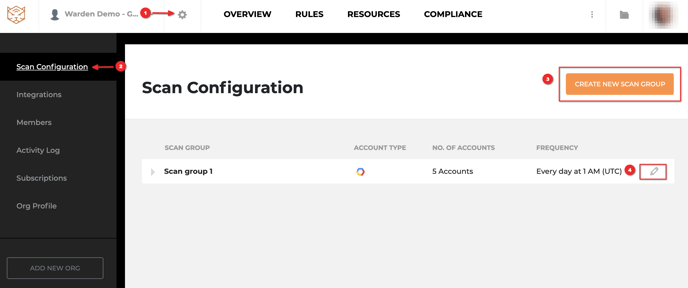
1. Navigate to the Settings page (gear icon), then click Scan Configuration on the left sidebar.
2. Create a new scan group or use an existing one.
3. On the Scan Configuration page, click on the pencil icon next to the scan group which you would like to import GCP projects into.
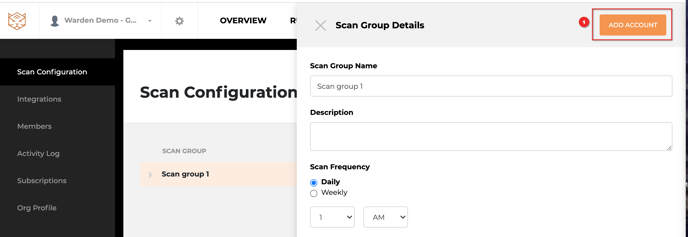
4. On the right-side panel, click Add Account.
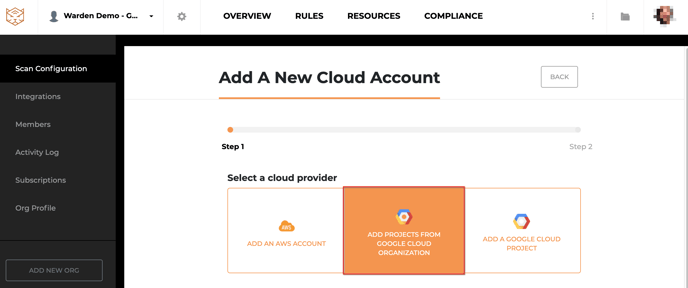
5. Select Add Projects From Google Cloud Organization and click Next.
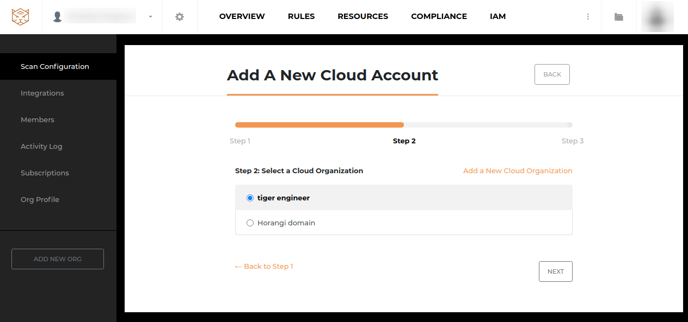
6. Select the Organization that you created previously and click on Next.
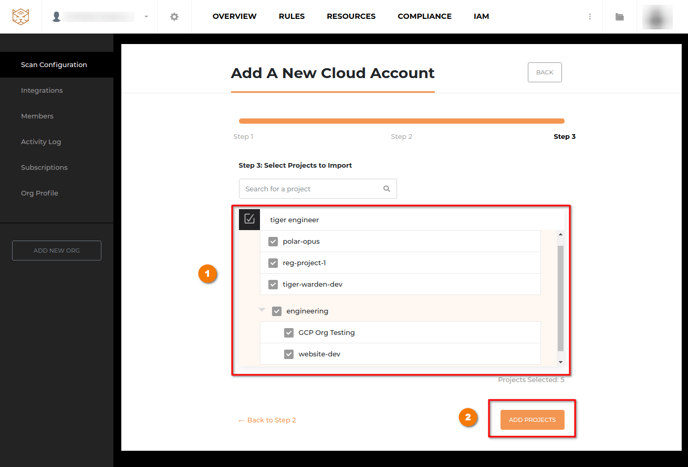
7. Select the projects you want to onboard in Warden and click Add Projects.
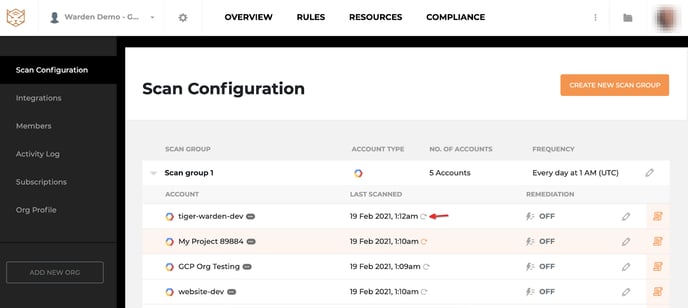
8. On the Scan Configuration page, you should see the projects imported into the scan group.
9. Click on the Refresh icon next to each project to start a scan.
Only projects that have billing accounts linked are imported. If there is a project in your organization that has not been imported, check to see if the project is linked to a billing account.