Before you can set up Warden Threat Detection in your Alibaba Cloud environment, there has to be a logging infrastructure in place. This document covers the required infrastructure you need to set up for Warden Threat Detection Integration.
Please note that OSS Buckets and MNS Topics must be created in the same region. Only the following regions are supported: China (Shanghai), China (Wulanchabu), China (Guangzhou), Singapore (Singapore). This will not affect the ability to capture events from all regions.
You can also see the same step by step guide on the integration page in Warden. Click here to log in to Warden to start integration.
Step by Step Guide
- Login to your Alibaba Cloud console.
- Create an OSS Bucket under OSS service - navigate to Buckets under OSS service.
- Click Create Bucket.
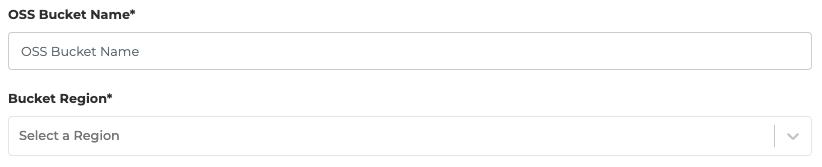
- Give an appropriate name (i.e, warden-log-ingestion-bucket) for the bucket name.
- Select the appropriate region for the integration.
- Select Standard as the Storage Class.
- Enable Zone-redundant storage.
- Select Private for the ACL.
- Optionally, enable either Encryption option.
- Click OK.
- Copy the OSS Bucket Name and paste it in the OSS Bucket field below.
- Create an MNS Topic - navigate to Topics under MNS.
- Click on Create Topic.
-
Use this for the topic name: <please-refer-to-the-topic-name-on-the-Warden-integration-page>
- Click OK.
- Click on Create Subscription.
- Give an appropriate name (i.e, WardenLogIngestionSubscription) for the subscription name.
-
Enter this URL for the Receiver Endpoint: <please-refer-to-the-url-on-the-Warden-integration-page>
- Select JSON for the Message Pushing Format.
- Click OK.
- Set up Bucket event notifications - Navigate to Event Notifications under MNS.
- Under OSS, click Create Rule.
- Select Custom Rule.
- Give an appropriate name (i.e, warden-log-ingestion-event-rule) for the rule name.
- Select PutObject for Event Type.
-
Select Prefix and enter the OSS Bucket Name with a suffix "/".
- Select Topic for Terminal Type.
-
Enter this name for Receiving Terminal: <please-refer-to-the-topic-name-on-the-Warden-integration-page>
- Click OK.
- [Optional] Navigate to the Resource Directory.
* This is only applicable for situations where multiple Alibaba Cloud Accounts are required. In a single account situation, you can skip this step. For more information, refer to Alibaba Cloud Resource Directory Documentation and Alibaba Cloud Actiontrail Documentation.
- Ensure that Resource Directory is activated, and that your master accounts and member accounts are configured.
- Set up a logging trail - Navigate to Trails under ActionTrail.
- Enable ActionTrail if it is not yet enabled.
- Click on Create Trail.
- Give an appropriate name (i.e, warden-log-ingestion-trail) for the trail name.
- [Optional] To create a Multi-account trail, select Yes for Apply Trail to All Members. Refer to Alibaba Cloud Product Introduction for more information.
- Click Next.
- Uncheck Delivery to Log Service.
- Check Delivery to OSS.
- Select Delivery to Current Account.
- Select Existing OSS Bucket.
- Choose the previously created bucket's name.
- Click Next.
- Click Submit.
- Create an RAM Custom Policy. Navigate to the RAM Policies page under RAM service.
- Click on Create Policy to create the OSS-related policy.
- Select JSON type.
- Copy the following text from the JSON here into the Policy Content field.
- Click Next.
- Give an appropriate name (i.e, WardenLogIngestionOSSPolicy) for Policy Name.
- Click OK.
- Create an RAM User Group - navigate to the User Groups page under RAM service.
- Click on Create Group.
- Give an appropriate name (i.e, WardenLogIngestionGroup).
- Click OK.
- Click Add Permissions on the created user group.
- Find and select the Custom Policy created in step 7.
- Click OK then Complete.
- Create an RAM User - navigate to the User page under RAM service.
- Click on Create User.
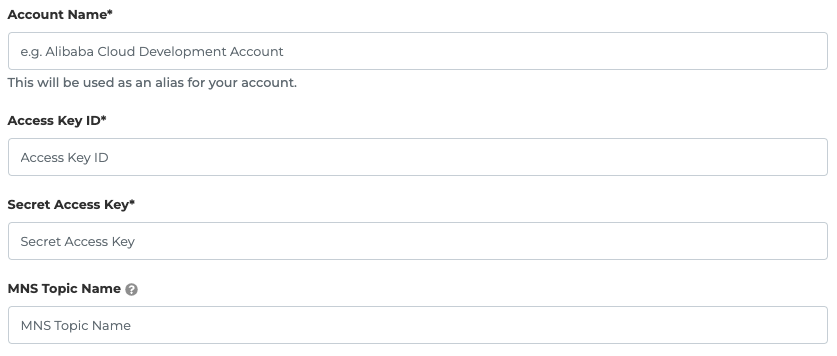
- Give an appropriate name (i.e, WardenLogIngestionSystemUser) for the Logon Name/Display Name.
- Select only Open API under Access Type.
- Click Download CSV file to save the Access Key ID and Secret Access key.
- Click the checkbox to select the user, and click Add to Group.
- Select the User Group created in step 8.
- Click OK.
- Copy the Access Key ID and the Secret Access Key from the downloaded file and paste it onto the corresponding fields below.
Continue to see How to set up Threat Detection Integration in Warden.